Thursday, 30 August 2012

What to do when yourphone gets wet?

What to do when your
phone gets wet?

Try this tips when the mobile get
wet-

1.First thing remove the battery as
soon as possible from mobile.
[Cause the power gets stopped and
thus does not affect the circuit and
board inside the mobile]

2.Dont forget to remove your sim
from the mobile unit.
[contains useful numbers]

3.Remove the panel and make the
phone to dry for 2-3 hours .
[ Use a paper as it helps to dry
quicker]

4. Place your mobile in bowl
containing rice [uncooked]  16-18
hrs.
[As this helps to dry out]

5.place your mobile in a plastic
pouch with silica
[comes with almost all electronic
goods, as it sucks the water]
Note-Don't use any sort of hair
dryers / hot objects as these may
lead to damage in the board/battery
may explode.

Try to reach your mobile service
provide if warranty includes any
water damage then u get a
replacement.

Hope the above things works for
you.


Read More

Want to find yourandroid phone when itsin silent mode?

Want to find your
android phone when its
in silent mode?

Not able to locate your android
phone and the phone is set in silent
or vibration mode.

No more worries!

Here comes the app-
Which enables you to change your
profile settings into ringer or vice
verse through sending an sms.

Not only it can enable/disable your
profile settings. It either can trace
your android phone through sms

The data which could be fetched
includes
1) Contacts (Fetching contact number
from your Address book)
2) Call Logs (Checking Missed Calls/
Received Calls/Dialed Numbers)
3) IMEI Number
4) Phone Profile (Changing profile
mode to Ringer or Silent)
5) SIM Number (Retriving SIM
Number)
6) SMS logs (Checking SMS's received
on your phone)

How it works:-

Example – 1
You reach your office and realise you have forgotten your phone at your home. Need to urgently call a client whose phone number you don’t remember Not a problem, with Agastya on your
phone- you can easily access and
retrieve the address book of your
phone remotely by sending a simple sms command to your phone number from your colleagues/friends
cell. Our app will take the effort to find your client’s number and SMS it back to you on your colleague’s number.

Example - 2
When your in class and phone is
silent mode and you forget where u
kept your mobile
here comes the simple trick.

1.Install app called agastya (via Market)

2.Sending an command sms from
any device[Eg- Nokia device] will turn
on your phone into ringer mode.
Cheers to the intelligent app -
agastya


Read More

Forgot lock pattern in your android device?

Forgot lock pattern in
your android device?

Forgot your lock pattern in your
android device chill here comes the
solution -

1. Enter the code pattern for more
    than 5times
2. Wait for a minute.
   
Then Your phone prompts 'forgot
pattern' .

3. Click on forget pattern.
4. Enter your google account  user name and password.
5. Click login.

That's it! you can later reset the lock
pattern.

[Note- Enter the
same google
account id which u
normally use in
your the mobile]

[Note-If you dont
have google
account then give a hard
rest to your mobile]


Read More

How to change Google account ?

How to change Google
account ?

There are quite a lot of reasons
to change or delete Google
Account on your Samsung
Galaxy Young Duos. For
example if you forget your
Account Password, you buy
used Android device and the
Google Account is belong to
previous owner, or you just
simply want to change it.
Whatever the reason, this time I
will give you a tutorial how to
change Gmail account.

There is two way to change the Google Account.
1. Factory Reset .
2. Delete accounts.db file .

Method # 1: Factory Reset

What is Android Factory Reset/
Hard Reset?

Factory reset or hard reset is a
method to make your gadget
software back to standard or
like-new condition out of the
box. It will erase all data and
applications installed in your
phone, include Gmail account
integrated with the device. It's
needed backup all important
data, files and applications,
before hard reset.

The Steps:
1. Go to the main screen by
pessing HOME button

2. Press the MENU button >
click on Settings > Privacy >
Factory data reset

3. Wait a while until the
process is complete
factory reset usually can resolve
all problems that caused by
software error.

For example, if
there is one of your default
application error, unable to start
Bluetooth or Wi-Fi, or if your
phone performance is slow or
full of lag etc.

Method # 2: how to change
Google account without hard
reset: Delete accounts.db file

This method only for Rooted
phone.
You need "Root explorer", and
this is the steps for this method:

1. Open the “data/system” with
root explorer

2. Find the “accounts.db” file >
delete the file

3. Restart your phone

Do With Your Own risk


Read More

Complete Guide of ClockworkMod Recovery


Today I am going write about ClockworkMod Recovery.Many of new users ask me how to do this in ClockworkMod recovery,how to do that in ClockworkMod recovery etc. So,in this post i am going to jot down every fetures of ClockworkMod recovery.Which help them like a guide.

1) We (Samsung Galaxy Y phone series) peoples dont have a permanent ClockworkMOD Recovery yet. So you need to Select the zip file verytime, if you want to use CWM.
2) you have to enable USB debugging mode on your device from Settings > Applications > Development.

How to install ClockworkMOD Recovery

  1. Download the CWM Recovery zip file and put it on the root directory of your SD card (Do no put it in any folder)
  2. Switch off your phone.
  3. Boot into Recoverymode (By pressing and hold Volume up button+Home button+Power button)
  4. Select "apply update from sdcard".
  5. Find the CWM zip file which you put into the root directory and select it by pressing the home button.
  6. Once done, it will give you the option to reboot your phone, reboot and you are done!
  7. Now you have CWM installed.

Let’s take a look at all the options it offers you to manage your Android device. I am using a Galaxy y Duos running ClockworkMod recovery 3.0.0.5 but the details should apply to other devices and other 3+ versions of the recovery as well, while versions prior to 3 will have some very minor changes that shouldn’t be an issue.

This is what you see when you reboot your device into ClockworkMod recovery:


You can navigate these options by using the Volume-Up and Volume-Down keys to highlight an option and the ‘Power’ key to enter/launch the highlighted option. Let’s review each of these options and their sub-menu options in detail.

1. Reboot system now - This one is self-explanatory.

2. Apply update from sdcard - This can be used for installation of any official or unofficial update, ROM, kernel, theme etc. that is in a zip format installable from recovery, as long as the file is named update.zip and it has been placed on the root of your SD card (i.e. not in any sub-folder). Selecting this option (and most of the options featured below) will bring up a rather annoying confirmation prompt but this has saved us on multiple occasions from a lot of trouble we would have been into due to accidental key presses. This is what we are talking about:


3. Wipe data/factory reset - This option wipes all user data on the device as well as cache. Doing this will leave your phone in the state it was in when you bought it or when any custom ROM was first installed. It will also wipe any sd-ext partition that you might have setup (more on this later).

4. Wipe cache partition - Wipes the cache partition of the device to clear all the data accumulated there over use. This is often used before installing a new ROM, app, kernel or any similar mod via recovery.

5. Install zip from sdcard - This option brings up the following sub-menu:

A. Apply /sdcard/update.zip - This one is essentially the same as the ‘apply update from sdcard’ option of the main menu.

B. Choose zip from sdcard - Lets you install any zip file (with any name) from any location on your SD card. The file can be for a ROM, a kernel, an application, a theme or any mod as long as it is in recovery-flashable zip format. This is the most widely used option for installing a ROM that you have downloaded and copied to your SD card. Entering this option will bring up a screen that will allow you to browse your SD card for the zip file and select it for installation as in this screenshot:


C. Toggle signature verification - Turns the signature verification on and off. When signature verification is on, you will not be able to install any custom ROMs that haven’t been signed by the developers (most custom ROMs aren’t signed). Switching it off skips the signature verification check and proceeds with the installation.

D. Toggle script asserts - Seldom-used option for a vast majority of users. It simply turns script asserts on or off. If you don’t know about these (we don’t), it’s best not to change this option.

E. +++++Go Back+++++ - Takes you back to the main recovery menu, obviously!

6. Backup and restore - Undoubtedly one of the most important features provided by a custom recovery, the backup and restore feature – also known as Nandroid backup – allows you to take a snapshot of your phone’s entire internal memory including all partitions, and save it on the SD card. Here is how it looks:

A. Backup - Takes a Nandroid backup, as explained above.

B. Restore - Lets you restore a previously taken backup. Entering this option presents you with a list of existing backups from the SD card that you can choose from for restoration.

C. Advanced Restore - This option is similar to the Restore option but once a backup has been selected to be restored, this option allows you to choose what parts of it to restore. You can choose to restore the boot, system, data, cache and sd-ext partitions, as shown here:

7. Mounts and storage - Allows you to perform maintenance tasks on all the internal and external partitions of your android device

A. Mount/unmount /system, /data, /cache, /sdcard or /sd-ext - These options let you toggle between mounting or unmounting these respective partitions. Most users don’t need to change these options.

B. Format boot, system, data, cache, sdcard or sd-ext - These let you directly format any of these partitions. Take extreme care with this option as formatting any of these partitions will result in losing all data on them, especially the boot and system partitions. Formatting the system partition will remove your ROM and leave your phone without an operating system while wiping the boot partition may brick your phone unless you restore or flash another one before rebooting your device. To learn more about the contents of all these partitions, see our guide to Android partitions.

C. Mount USB storage - Lets you enable USB mass storage mode for your SD card right from recovery so that you can connect it to your computer via USB and transfer any files to/from it without having to leave recovery.
8. Advanced - This section contains a few options most users will not require, though these can come handy quite often, especially wiping Dalvik cache, which is required before most ROM installations. Here are the options from this section:

A. Reboot Recovery - Lets you directly and very conveniently reboot from recovery right back into recovery. This is useful option for certain back-to-back installations that require the device to at least boot once between them.

B. Wipe Dalvik Cache - Allows you to wipe the cache for the Dalvik virtual machine (the custom-built Java virtual machine for Android).This is required before most ROM installations and at other occasions too, for fixing some problems.

C. Wipe Battery Stats - Wipes the saved battery usage statistics and effectively recalibrates the battery. Useful in various scenarios when Android isn’t showing correct battery levels.

D. Report Error - In case of errors, this feature can be used to save a log of recent ClockworkMod recovery operations on the SD card that you can later report from Android using ROM Manager.

E. Key Test - Lets you press any of the hardware keys to see if they are properly functioning, and to see their key codes.

F. Partition SD Card - This option gives you a no-frills way to partition your SD card properly for use with ROMs that support data2ext (a very handy hack for low internal memory devices that enables an /sd-ext partition on the SD card to be used as the internal user data storage i.e. as the /data partition). Once this option is selected, you will be given options to choose the sizes for the /sd-ext partition as well as an optional /swap partition on the SD card, and will then automatically format it for you, leaving the remaining space for normal SD card usage. This option will wipe all data from your SD card so use it with caution!

G. Fix Permissions - Fixes the file permissions for the internal memory partitions back to default. This is very useful as a fix for several errors and Force-Closes that start appearing after you or an application you installed and provided root access end up messing up the permissions of important files.
Read More

Wednesday, 29 August 2012

Basic Knowledge about Android

Basic Knowledge about Android:--

For a new Galaxy user.....this informations are so much valuable.

*CWR aka ClockworkMod
Recovery -
A custom recovery for Android
phones and tablets that allows
you to perform several
advanced recovery, restoration,
installation and maintenance
operations on your Android
device that aren’t possible with
the stock recovery.

*Superuser -
A progam which gives unlimited
access privileges to perform any
or all operations on the
operating system.

*KIES mini-
Kies Mini is an official
application from Samsung that
is used to update the software
on your phone. It should not be
confused with the full Kies
application, which has a lot
more functionality and is not
officially supported in the USA.
Therefore, abbreviating "Kies
Mini" as just "Kies" can cause
confusion.

*ODIN -
Odin is the Samsung software
used to update Samsung
phones. It does not work with
any other devices other than
official Samsung phones.

*OTA or FOTA -
(F)OTA stands for (Firmware)
Over The Air and is the process
by which required updates and
enhancements to your phone's
basic operating system can be
sent to you through the cellular
network. The Galaxy S II
software update will be sent via
FOTA and is available through
Samsung Kies mini.0

*ODEX-
In Android file system,
applications come in packages
with the extension .apk. These
application packages, or APKs
contain certain .odex files whose
supposed function is to save
space. These ‘odex’ files are
actually collections of parts of an
application that are optimized
before booting. Doing so speeds
up the boot process, as it
preloads part of an application.
On the other hand, it also
makes hacking those
applications difficult because a
part of the coding has already
been extracted to another
location before execution.

*DEODEX -
Deodexing is basically
repackaging of these APKs in a
certain way, such that they are
reassembled into classes.dex
files. By doing that, all pieces of
an application package are put
together back in one place, thus
eliminating the worry of a
modified APK conflicting with
some separate odexed parts.
In summary, Deodexed ROMs
(or APKs) have all their
application packages put back
together in one place, allowing
for easy modification such as
theming. Since no pieces of
code are coming from any
external location, custom ROMs
or APKs are always deodexed to
ensure integrity.

*Busybox -
A set of Unix tools / commands
that has been compiled for use
on your phone. These are not
usually full-featured versions of
the Unix commands found on
the larger platforms
counterparts, but they are pretty
close and useful nonetheless.

*3G/4G -
3G/4G is the term generally
used to describe 3rd/4rth
Generation mobile
telecommunications, specifically
allowing for greater throughput
of data over cellular networks.

*Baseband/Modem -
Baseband refers to the original
frequency range of a
transmission signal before it is
converted, or modulated, to a
different frequency range.

*Bloatware -
Software or 'apps' that you
don't need, but come
preinstalled to a device's /
system partition, meaning that
you cannot remove them unless
the device has been rooted.
Usually, these are apps are
sponsored by a company and
included by a carrier for profit.
For example, the Photobucket
app included on the G2 by
TMobile.

*CDMA -
Code division multiple access
(CDMA) is a channel access
method used by various radio
communication technologies. It
should not be confused with the
mobile phone standards called
cdmaOne and CDMA2000
(which are often referred to as
simply CDMA), which use CDMA
as an underlying channel access
method.

*Firmware-
Programs stored in the ROM,
EPROM, or flash memory that
usually control various internal
electronic devices (Hard Drives,
Keyboards, Displays, etc).
Firmware is typically 'fixed'
software that is not updated in
consumer devices, however it is
often updated (or 'flashed') by
advanced users to fix bugs or
add features to the device.
Flashing firmware designed for
one device onto a different
device, or not following a
specific procedure while flashing
will often render the device
unusable.

*Flash -
Non-volatile computer storage
that can be electrically erased
and reprogrammed (similar to
EPROM). No power is needed to
maintain the information stored
in the chip. This technology is
primarily used in memory cards
and USB flash drives for general
storage and transfer of data
between computers and other
digital products. Because of its
ease of use, speed, ability to be
updated (see flashing), this
technology is often used in
mobile devices, PDAs, digital
media players.

*Kernel -
The central or core software
component of most operating
systems. Its responsibilities
include managing the system's
resources (the communication
between hardware and software
components) and can provide
the lowest-level abstraction layer
for resources (especially
memory, processors, and I/O
devices).

*IMEI -
The International Mobile
Equipment Identity is a number
unique to every GSM, WCDMA,
and iDEN mobile device, as well
as some satellite devices. The
IMEI number is used by the
GSM network to identify valid
devices and therefore can be
used to stop a stolen device
from accessing the network. For
example, if a mobile device is
stolen, the owner can call their
network provider and instruct
them to "ban" the device using
its IMEI number. This renders
the device useless, whether or
not the device's SIM is changed.
The IMEI can be displayed by
dialing *#06#.

*IRC -
Internet Relay Chat. Basically a
chatroom, or a cross between
Instant Messaging and a forum.
*Open-source -
Open-source is software that
anyone is allowed to see the
'source' code. In the context of
Android, Open-source refers to
the approach to the design,
development, and distribution of
software. This offers accessibility
to a software's source code for
modification, improvement,
bug-fixing, and security-
enhancement. CyanogenMod is
based on this principle.

*ASOP -
Android Open Source Project

*Radio-
The cellular radio on the device
which needs control software
called firmware to control it.

*ROM -
Read Only Memory. In the
context of an Android device,
ROM is the internal flash
memory where the core
operating system resides. It can
also refer to a specific version
firmware that can be applied to
a device through a process
usually referred to as flashing.
An improperly flashed ROM can
often brick the device, rendering
it unusable.

*SDK -
Software Development Kit. You
can find the Android SDK
at http://galaxyyoung.in

*Vanilla -
A clean, unmodified version of
something. In the context of
Android ROMs, vanilla refers to
the stock ROM that came pre-
installed on the device.

*Widget -
An application that lives (in
other words, is always running)
on the homescreen instead of
being 'run' like a regular app.
Common examples are
calenders and weather widgets.
Android Specific Definitions

*ADB -
Android Development Bridge.
Command line tool used to
communicate with & control the
device over a USB link from a
computer. The ADB command is
found in the Android SDK.

*Android -
Unveiled on 5 November 2007,
Android is a mobile operating
system running on the Linux
kernel developed by Google.

*Apps2SD -
Move applications from the
internal NAND memory on the
device to a removable SD Card.

*CyanogenMod Updater-
An updater written by Cyanogen
that allows you to receive OTA
(Over-The-Air) updates to
CyanogenMod.

*Dalvik-Cache -
The dalvik-cache directory holds
all of the pre-compiled .dex files
created from installed apps.
These files are static and do not
change unless the app is
updated.

*Fastboot -
Fastboot is protocol used to
directly update the flash
filesystem in Android devices
from a host over USB. It allows
flashing of unsigned partition
images. It is disabled almost all
production devices since USB
support is disabled in the
bootloader.

*GApps -
See Google Apps.

*Google Apps-
An add-on for Google's
applications (Market, GMail etc.),
packaged separately to avoid
copyright issues

*Logcat -
A debugging tool built into
Android devices that displays
system logs as they occur. See
Logcat.

*NANDroid -
A set of tools that will enable
anyone who has root on their
Android device to make FULL
system backups, in case
something goes wrong or you
want to try out that new
experimental ROM/theme.
NANDroid will backup (and
restore) /system, /data, /cache,
and /boot partitions.

*Recovery Mode-
A special environment that you
can boot into for
troubleshooting and upgrading
purposes.

*Tethering-
Using a wireless device (e.g. an
Android phone) to share it's
wireless data connection to
another device (e.g. laptop).
With an Android device, the
wireless data connection can
usually be shared via WiFi,
Bluetooth or USB connection.

*Wipe -
Usually refers to wiping data and
cache partitions of the device.

*Zipalign -
Reduces the amount of RAM
consumed when running the
application by allowing data to
be mmap'd in; which causes all
uncompressed data within
the .apk, such as images or raw
files, to be aligned on 4-byte
boundaries.
Hacking Definitions

*Aftermarket -
Aftermarket generally refers to
any product or service applied
or requisitioned by end-users to
add usability or functionality to
the original product. Many
aftermarket modifications can
void the manufacturer's
warranty. From a
manufacturer's perspective, the
after-market is any goods or
services offered by the
manufacturer directly to end-
users of a given product or
service. After-market services
include support for warranties,
contracts, and parts and
accessories sales

*Brick -
a device that no longer
functions, generally caused by a
failed firmware or SPL update.
Since the device no longer
works as intended, it is often
referred to as a "brick" or
"paper-weight", since that is all it
is good for.

*Flashing -
The process of applying a
firmware image (or ROM) to a
device. It generally entails a very
specific order of steps. Failing to
complete any one of these steps
properly may result in bricking
the device.

*Kang -
The process of creating a code
based of someone else's code
or reapplying code that
someone else created into your
own code (e.g. git cherry-pick)

*Rooting -
Obtaining root ("administrator",
or "full") access to the device.
This means you can mount its
internal memory partition as
read/write, which lets you do
various things: have USB or Wi-Fi
tethering, uninstall applications
you otherwise can't uninstall
(e.g. the Amazon MP3 store),
install applications that need
root access (such as AdFree),
disable the camera shutter
sound (simply by deleting the
shutter sound file), overclock or
underclock the CPU, install and
boot Debian, and so on.
Installing CyanogenMod roots
the device in the process. The
"Superuser" app controls what
applications may gain root
privileges.

*Unlock -
Most GSM devices are locked to
only work with the sim cards of
a particular carrier. Obtaining
root access (e.g. installing
CyanogenMod) on the device
usually does nothing to the sim-
lock. The usual way to unlock
the device to all SIM cards is to
obtain a subsidy unlock code
from a carrier.


Read More

How to Run AndroidApps in Computer

How to Run Android
Apps in Computer

Yes now it is possible.

The success of Android operating
system is gradually depend upon
the apps they are running. Android
Market has really very cool and
handy Apps which are daily used by
millions of people. As the popularity
of Smartphone’s and tablets
increases, so the uses and
dependencies is on the apps
available for them. Whether the App
is a hot game, a handy price
checker, or a useful contact
manager, the constraints of
Smartphone and tablet designs and
interfaces have forced app
developers to find creative ways to
present and access data. But
unfortunately, most apps created for
Smartphone’s or tablets aren't
available for use on a PC. But here is
the solution; there is a one company
called BlueStacks in California who
releases the Alpha version of app
player which is the software or what
we say an emulator for the Android
Apps. The BlueStacks app player
essentially runs an instance of
Android in a virtualized environment
on the PC, so the apps act as
though they're running on a mobile
device. So follow the steps below to
run the Android Apps in Pc.
Download BlueStacks and Install

Step1: To use the BlueStacks app
player, you must first download it
from the BlueStacks website .

Step2: Installer is light weight
around 3 MB and it downloads in
snap. Just follow the instructions
and it install’s in little moment.
Keep in mind that the BlueStacks
app player is still in the early phases
of development, so you can expect
some minor performance issues and
perhaps a bug or two.
When the installation is complete,
you'll see a short video describing
how the BlueStacks app player
works and how you can access a
few key features, Just skip it.
How It use?
To use BlueStacks and to transfer
the android apps from your
computer. You’ll have to register for
a free BlueStacks account with either
a working email address or a
Facebook account. The main allure
of the BlueStacks app player is its
ability to send apps from your
Android device to your PC via the
company's Cloud Connect mobile
app and servers.
When you register an e-mail
address or Facebook account with
the BlueStacks app player, the
service will link a personal
identification number (PIN) to your
email account. To transfer apps
from your Android device, launch
the Android Market on your Android
tablet or Smartphone, and search
for BlueStacks Cloud Connect .
Download and install the Cloud
Connect app on your phone or
tablet; don't worry-- it's only 402KB .
With that app in place, you can send
any other app that's installed on
your mobile device to the BlueStacks
app player on your PC. Essentially,
the Cloud Connect app uploads
selected apps from your phone to
BlueStacks' servers, where you’re PC
can then access and download
them to your PC.
To use BlueStacks Cloud Connect,
simply launch the BlueStacks and
select the Android apps on your
device that you'd like to upload for
transfer to your PC. Then click
the Sync button at the top of the
interface, and wait for the apps to
upload (all of thae apps installed on
the mobile device will be listed). The
uploaded apps should be visible in
the BlueStacks app player on your
PC when you launch the 'Get More
Apps' tool.

Once your apps are uploaded and
the app player has notified you that
they're available, select Get More
Apps from your BlueStacks app
player's PC client and click the Cloud
Connect link. From there, a screen
should pop up that lists all of the
apps you uploaded from your
mobile device.

Click the Subscribe
button underneath each app, and
you should be able to run your
favorite Android apps from the app
player on your PC.
Here what I am running. Hope you
like the post and enjoy the Android
apps on your computer.

Download Bluestack


Read More

Share your Androidapps

Share your Android
apps

How To Share Android Apps:-

You have to do few things
1. Just open the menu.
2. press the options key on the left side of
Samsung galaxy y/Duos.

You will see
two options,

the first one is 'edit'
and
other one is 'share app via'.

3. Click on 'share app via'.

When
you click on this a list of existing
apps on your device will
open.You can select which apps
you want to share,

4. Select them
5. Click 'done'.

After clicking the
mode of sharing will appear,you
will see options whether to share
apps via Bluetooth,via gmail,via
Facebook,via email etc.Select
Bluetooth if you want to share
these apps with other android
devices.


Read More

Saturday, 25 August 2012

Steps to Protect or Find your Lost Android Phone


Most of us are addicted and dependent on our Android phone for day to day life. We start our day with Alarm and ends with a Beautiful music (All these we are doing in our Android phone). We can't even think about the day without our beloved Android phone. What if your Little buddy lost and Stolen? What can we do without him? How can we track our Buddy? Is he/she still alive? There are so many questions will arrive, if we think about this.

So here i complied Ways to find your Lost Android phone. These are apps which will help to Find/Protect your Android phone. I've complied according to the votes on Play Store. If you haven't tried or Installed any of these apps, i advise you to try/install it. So that you find or track your phone easily.

1) Where's My Droid


          With total votes of 4.6, Where's my Droid is holding the First place in my list. This app is trusted by almost 50k users world wide. Lets look out the features of this app.

* Find phone by making it ring/vibrate
* Find phone using GPS location
* Text your attention word
* Control from Commander at WheresMyDroid.com
* Passcode protection to prevent unauthorized app changes
* Notification of changed SIM card or phone number
* Stealth Mode hides incoming text with attention word
* White/Black list to control who can use the app via text
* No battery drain

Apart from the above features, Where's My Droid Pro has so many other powerfull features.

Download Link - PlayStore
Official Site - Wheresmydroid.com

2) Android Lost


          With the total votes 4.5, Android Lost took a place of Second in my list.. Lets look at the features of this app...

* read sent and received SMS messages
* wipe phone
* lock phone
* erase SD card
* locate by GPS or network
* start alarm with flashing screen
* send SMS from web page
* message popup
* forward calls
* remote install
* phone status: battery, imei, etc.
* remote SMS alarm
* remote SMS lock and unlock
* remote SMS erase SD card
* remote SMS wipe phone
* remote SMS APN control
* start/stop GPS
* start/stop WIFI
* hide from launcher
* email when SIM card is changed
* get call list
* take picture with front camera
* take picture with rear camera
* make your phone speak with text-to-speech
* SMS message command
* SMS speak command
* lock timeout
* restore settings on boot
* record sound from microphone
* start and stop data connection from SMS
* start and stop WIFI connection from SMS
* content browser prototype

Download Link - PlayStore
Official Website - www.androidlost.com

3) Cerberus Anti Theft


          With the total votes of 4.6, Cerberus Anti Theft holding Third place in my list... Lets look out the Features of Cerberus

* Remote control through the website www.cerberusapp.com
* Remote control via text messages
* SIM Checker (for devices that have a SIM card): you will automatically receive alerts if someone uses your phone with an unauthorized SIM card
* Locate and track it
* Start a loud alarm, even if the device is set to silent mode
* Wipe the internal memory and the SD card
* Hide Cerberus from the app drawer
* Lock the device with a code
* Record audio from the microphone
* Get a list of last calls sent and received
* Get information about network and operator the device is connected to

Download Link - PlayStore
Official Website - www.cereberusapp.com

4) SeekDroid Lite


        With the total votes of 4.2, SeekDroid holding Fourth place in my list. Lets look out the features of this app.

* Control Multiple devices under one account (*)
* Locate your device
* Remotely Enable GPS
* Display its location on a map with history! (*)
* Track the device using breadcrumbs (*)
* Get notified if the device has left a fenced in area (*)
* Text Messaging support
* Virtually no battery drain
* Works without a SIM Card

Apart from Features of Lite version, SeekDroid Pro (SeekDroid AntiTheft & Security) has so many other features.

Download SeekDroid Lite - PlayStore
Download SeekDroid Pro - PlayStore
Official Website - www.seekdroid.com

5) Locate My Droid

(Not Supported for Samsung Galaxy Y Series Phones)

PlayStore Votes - 3.9
Download Link - PlayStore
Official Site - www.locatemydroid.com

You lost your mobile already? and you didn't installed any of the Apps above?


        No Problem, like in military we have a Plan B. No! The app name is Plan B, It is designed for the worst cases like i mentioned above. Plan B is an developed by LookOut Mobile Security. It is one of the best conceptual app for Finding your Lost Android.

How it works?

1) Install Plan B through PlayStore website.
2) Once installation is successfull, The Plan B starts to send recent location of your Android. It will keep on sending the location details to your Gmail ID, when the phone's location is changing.
3) To locate again, text the word 'locate' to your lost phone. And you will get the location details in your friend's phone.

Download Link - PlayStore
Official Site - www.mylookoutsecurity.com

Other method to finding the Lost Android phone is using Google Latitude. Since we are Android users, we have Google's latitude is Pre-installed in our mobile. So using Latitude, you can find the last location of your Lost Android.

Note: The methods of Plan B and Google Latitude are secondary methods. I advise you to use the other apps which i have mentioned above. If your phone is already lost and you didn't installed any of the app which i have mentioned, you can go for Plan B and Google Latitude.

Apart from the above Apps, there are also other apps which perform well for Protecting or Finding your Lost Android Phones.

Share your Views and points with us, if you have any!

PEACE!!!
Read More

Sunday, 19 August 2012

How to Browse Internet in PC with Samsung Galaxy Y/duos


How to Browse Internet in PC with Samsung Galaxy Y/duos

Friends,it is very easy now to browse internet with our Galaxy Young.

Required Things

1. PC (Recommended OS-Windows      XP(service pack2), Windows
Vista, Windows 7)
2. Usb data cable.
3. Kies.
4. Galaxy device.

Steps


1. Download Kies Software from this  Link.
2. Install it in your PC.
3. Connect your phone to Pc with usb data cable.
4. Open kies.
5. In your phone go to --
Settings => network and wireless => tethering and portable hotspot => then tick on usb tethering

That's it. Now you can browse internet in your PC with Galaxy young.
Read More

Wednesday, 15 August 2012

How to use your Phone as WebCam? [Tutorial]


Hello Everyone! In this tutorial I'm Gonna show you, How you can use your Android Phone (Samsung Galaxy Y Series Phones or anyother phone) as a WebCam for your Windows powered PC or Laptop... For now this tutorial can be used only for the Windows Users...

Note: In this tutorial, i showed you how you can use your Phone as WebCam through USB Cable... You can use it in some other ways like WIFI or Bluetooth... To know about Bluetooth or WIFI method Go Here

Downloads


1) DroidCam (Windows)


2) DroidCam Wireless Webcam APK - Download


Steps to Install

  1. Download and Install DroidCam.3.5.exe in Windows PC or Laptop.
  2. Download and Install DroidCam Wireless Webcam APK on your Phone.
  3. Now connect your phone to PC using USB Cable (Make sure you already installed Samsung Kies or Samsung USB Drivers in your PC).
  4. Now lauch the DroidCam windows application from Start Menu, you will see this
  5. Launch the DroidCam Application in your phone and Click "Connect to Phone (USB)" in Windows application.
  6. After that, your Phone IP field box on right side of the app will turn to unclickable box (turns to Grey color) (It means that your USB cable configuration is successful)
  7. Now hit "Connect" in Windows application, wait for few seconds and now you will see that DroidCam app launches its default Camera app on your phone...
  8. Thats it... Now you're connected, place your phone somewhere comfortable to show your face... and Enjoy the Caming!!!

Peace!!!
Read More

Sunday, 12 August 2012

Customize your Galaxy Young with Dock4droid Unlock (FREE)

Customize your Galaxy Young with Dock4droid Unlock (FREE)


Best way to customize your device...

Dock4Droid is the first Dock task manager for the Android platform. You can quickly access your running tasks from anywhere you currently are in your phone or launch new apps from the current screen. Icons are rendered in a wave-like parabolic view and tasks are accessed by sliding your finger on the dock. This app is an Unlock version.


Download it from HERE

Installation:-
1.First extract the rar file.
2.Then install the main apk file first.
3.Then install the unlock version. 
Read More

Thursday, 19 April 2012

Best Alternatives for Instagram


Since the Launch of Instagram for Android... Its been talking all over the Internet... I know its ONE of the best Photo Sharing App... But its not the THE BEST... Why people so crazed about Instagram??? Because Facebook took it over???? I really don't know why... I am one of the active user of Samsung Galaxy Y Facebook pages... On average out of 10 questions from the FB page, 5-6 questions about Instagram... Why its not working properly on my Galaxy Young??? Its not Installing, What should i do??? and blah blah blah...  Here are the BEST ALTERNATIVES TO KICK INSTAGRAM out of the internet... These Apps aren't popular like Instagram, Because it was developed and maintained by Individual... And Lack of Advertisement... Lets go for the list...

1) PicPlz


PicPlz has actually been around longer than Instagram, and it's one of the BEST. Like Instagram, PicPlz offers photo filters and frames that you can easily apply with a couple of taps. You can also turn your image into a meme, draw on it, crop, rotate, and perform a few other actions you won't find in Instagram's app. You won't have some of the neat filters like Tilt Shift, but you do have pretty much the same sharing options. If you want an alternative that offers much of the same functionality, PicPlz is a good way to go.

Download from Market 

2) Pixlr-o-matic


If you love adding borders and filters to your photos, playing with the colors, or adding sepia tone to make them look like old-timey snapshots or 60s-era polaroids, Pixlr-O-Matic is the app for you. The real focus of Pixlr-O-Matic is the filters, the borders, the tweaks, and all of the changes you can make to your photos. In the end, you get over 2 million different permutations and options to make your photos look just right before you save the finished product to your camera roll or gallery and then share it with your friends.

Download from Market

3) Lightbox Photos


It is pretty sharp, sports a ton of photo filters, and is really snappy and responsive, and you have the ability to set your photos as public, private, or unlisted so only the people you choose can see them, whether they're members of the service or not. One tap also posts your images to Twitter, Facebook, Tumblr, Flickr, FourSquare, and more. Perhaps best of all, if you prefer a different camera app than your phone's stock one, Lightbox Photos will let you take your photos with your preferred tool.

Download from Market

4) Streamzoo


It is better alternative to Instagram, partially because of the way it turns editing and sharing your photos into more of a social game that's addictive to play. You can earn badges - much like FourSquare - for sharing photos, adding effects and borders, or even for taking pictures of specific subjects, like your dog or your dinner. Whether you encourage the behavior or not, StreamZoo is a pretty addictive app to use. The app supports 14 different filters, 15 photo borders. You even get the missing from Instagram tilt-shift option for your shots, in rectangular, elliptical, circular, and parallel varieties. Finally, you can also edit your photos crop them, rotate them, edit the contrast or color balance, whatever you choose.

Download from Market 

The above showed Apps are Best alternatives or even Better than Instagram... The Apps are way better in more features... Surprisingly these Apps are not so famous as Instagram, Because these are Developed and Maintained by Individual or a Small Group of peoples... In my opinion These Apps are really better than Instagram... And its Supports for Samsung Galaxy Y... Give it a try and Try Donating the Developer to get more features...

Enjoy Unlimited photo Sharing without any worries...
Read More

Sunday, 1 April 2012

The Things to do after ROOTing your Device.


Rooting is a most Powerful word which can be frequently used by most of the Android Users. You can hear this word atleast twice per day. First of all What is Rooting? Go here to learn more about it.. Most of the people ROOT their device for an hope that they can do whatever they want.. But unfortunately they fail after ROOTing their device.. Because they don't know what to do after ROOTing... Thats why i'm keep on saying Explore guys... Explore... You will know more when you exploring... For those who want to know What to do After ROOTing your Device... Here are the Few Apps which is worth of Rooting...

Do you want to know How to Root your Galaxy Y? GO Here...

1) Superuser - The Principal


 He is the One responsible for Granting all Apps' ROOT access... He is very important after ROOTing... For us we don't need to install it manually after ROOTing.... Once we ROOT our device... He automatically sits in our App Drawer and Manages everything...

2) Titanium Backup - The Administrative Officer


He is responsible for Backingup your Entire System... He is most powerfull Backup system in entire Android Galaxy.... He can backup your App and its Data... He can Uninstall System Apps and Bloatware... And Restore Backed up data... Move apps to SD Card and Freeze and DeFrost Apps... There is so much you can do with Titanium Backup.. So give it a try...

Download Titanium Backup (Free) - Market or Store

3) Droidsail Super App2SD - Dean


He can move All user apps to SD Card without an Effort... I'm using this App... It is best for me... Notification on Status Bar when an user apps is capable of moving to SD Card... Easy Interface... Move Apps to SD Card or Move Apps to Phone... 

Download Droidsail Super App2SD - Market 

4) No-frills CPU Control - Head of the Department


 He is used to utilize the entire CPU usage... With this app we can use our 832Mhz frequency completely... In general the Manufacturer restricted the Full usage of CPU Frequency... With this App you can utilize your maximum CPU Frequencies and Governors and I/O Schedulers.. Give it a try and Fasten your Seat belts...

Download No-frills CPU Control - Market

5) Es File Explorer - Librarian


He is an File Explorer tool... You can use this App for Non-Rooted device too... But when you Root your Device, This App can explore the Phone contents like System folders and etc... i.e. you can access the Internal Storage... It is easy and very Effective....

Download ES File Explorer - Market

Root Explorer - Librarian


He is an another File Explorer...  But this app only works when you have an ROOT access... The Name itself defines the state... It is very easy then ES File Explorer... But he will not work for Free ;-)

Download Root Explorer - Click Here (V2) [He is free now download]

6) ROM Toolbox - Chancellor


He is really a one good tool for all work... It has App manager, Root File Browser, Scripter, A Blocker, Apps2SD, Font Installer, Build.prop Tweaks, Auto Memory Manger and so many... Just give a try...

Download ROM Toolbox (Free) - Market

Note: There are so many apps which you can install after ROOTing your device... Here i mentioned only essential apps... You can install all the Apps i mentioned above or what you need Its your wish... And after ROOTing you can do so many things other than i mentioned above... the Things are like Customizing your Device, Changing Themes, Playaround inside the System apps and Increase your Performance by using Some Scripts and Change default Boot Animation and so many... It depends on your interest... So i advice you to Explore as much as you can... And learn something new if you're interested...
Read More

Thursday, 15 March 2012

How to Increase Galaxy's Performance and How to Tweak your RAM to work FAST? [Tutorial] [Root]


One of the Worst thing in the Android is When you install Many Apps... It will lag like hell... When you Overclock your Galaxy Y... It couldn't help... I myself experience it... Then i searched here and there about Tweaking RAM performance... I finally found out a Method to Tweak your Galaxy Y's RAM Performance... It really works Great with my Galaxy Y... There are two scripts to make your RAM Perform well... These Scripts are called V6 Super Charger and Kickass Kernalizer... These are the only Scripts which Tweaks almost all Android Devices and All type of ROMs... Whether its Stock ROM or Custom ROM, it doesn't matter... Okay Here we go...

Note: This Tweak can only perform in Rooted Galaxy Y... Do you want to Know How to Root your Galaxy Y... Click here for the Tutorial

V6 Super Charger

What is V6 Super Charger and What it Does Actually?

  • Android memory consumption concept is all about efficiency. The device’s RAM is a resource that is meant to be used; 100% of it (if possible), all the time (if possible).
  • Android utilizes unused RAM to cache data and filesystem meta-data from slower storage devices (Flash or disk) because fetching the information from the RAM is much quicker.
  • So the Super Charger does is, It rearranges and fixes the OOM Groupings and Priorites and lowmemorykiller values.
   
Benefits of V6 Supper Charger

  • It's a Complete Memory Management Fix to make your Phone Fast and Supper Snappy with better Multitasking!!! 
  • No Launcher Redraws, faster than ever, multitasking is better... why? Because it works with the lowmemorykiller and letting it work the way it's meant to work.
  • Also, because of the rearrangement, it works the same on all roms!


Requirements
  1. Busybox Installer - Download from Market
  2. Script Manager - Download from Market
  3. Script Manager Widgets - Download from Market (Optional)
  4. V6 Super Charger Script - 4Shared
  5. Kickass Kernalizer Script - 4Shared

Note: Don't bother about the Extension of the Script... Yes, I know its in PDF format... Just leave as it is...

Steps to Install

1) Make Backup of your Existing ROM using CWM - Download

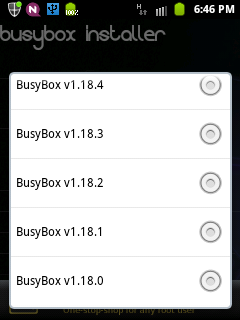
2) First we are going to Install BusyBox V1.18.2... Open Busybox Installer and follow the below steps...

    2.1) This is the First screen when you open Busybox Installer... Now Tap the Down arrow key to select Busybox V1.18.2...


    2.2) Once you installed Busybox V1.18.2, you will see this confirmation message...


3) Now we are going to Run V6 Super Charger Script... Follow the below steps carefully and accurately...

    3.1) Now open Script Manager Ads... Since this is the first time we are launching Script Manager... Allow 'Browse As Root' option...


   3.2) Now Scroll down and select 'V6_SuperCharger_for_Android-Update9_RC6.9.sh' pdf file... 


    3.3) A popup window will appear. On this window, select the "Fav" and "SU" buttons near the top (adding to favorites makes it easier to access later), then click "Run" in the top left...


  3.4) Now Text will start scrolling, you can scroll up at any time if you missed something. Script will do a bunch of tests to make sure you've got busybox and all that, your phone should pass fine. When asked to choose a scroll speed, choose 'Fast' by entering '1'...


   3.5) Now in the next step select 'local.prop'...


    3.6) In the Next Step Select 'No'


    3.7) You should now see the 'Driver's Console' a list of options numbered 1-30 and below that, various information on what's going on with your phone about SuperCharger....
           At the Driver's Console, you will need to pick one of the options listed under 512 HP (5, 6, or 7). Choosing 5 means more apps can run in the background, but the performance benefits will not be great... Choosing 7 will have the greatest performance benefits, but you may end up with a lot of apps being closed behind your back... If you're not sure which one you should pick, Choose 6. This is the best option for most people...


   3.8) Whichever the option you choose, It will ask you to 'SuperClean & Restart'... And you must do... It will Wipe your Dalvik Cache...


   3.9) After restart, open Script Manager and launch the V6 script again (if you added it to your favorites, once in Script Manager, click Menu Button > Favorites). Now in Driver Console Select option '13' which is 'OOM Grouping Fixes + BulletProof Launcher'... And give 'Yes' to install BulletProof launcher...


    3.10) Now back in Driver Console optoins, Select '20' Which is 'Nitrolag Nullifier'... Then Give 'Yes' to Drop all the caches...


   3.11) Then again back in Driver Console, Select '18' which is 'Engine Flush'...


    3.12) Then back to Driver Console, Select '29' which is 'Super Clean & Restart'...


4) When you finished all the above steps...  You should notice a considerably faster startup time and a much snappier launcher. Lets verify everything was installed correctly by launching the script one more time...

5) When you get to Driver's Console, look at the area below the options, you should see the following messages (you'll see others too, but these are the important ones)
  • Launcher is BULLETPROOF! i.e. SUPERCHARGED!
  • OOM Grouping Fixes ARE in effect!
  • Current values MATCH Prior SuperCharge!
  • Nitro Lag Nullifier is Installed!

6) If you see Everything there... Thats it, You successfully installed the V6 Script... Enjoy the Performance of your Device...


Kickass Kernalizer


What is it?
  • Everyone said this will Tweak your Galaxy Y to Perform more faster and it tweaks I/O Scheduler..
  • But for me, After installing this script my SDCard Scanning is Blazing speed... It really Increases my I/O device performance...

Steps to Install

1) Now just like the above steps... Open 'Script Manager' and select the 'KickAssKernelizer_Tweaks_Installer_Update_3_RC6.sh' pdf file... A popup window will appear. On this window, select the "Fav" "SU" and "Boot" buttons near the top, then click "Run" in the top left...


2) Now Text will start scrolling, you can scroll up at any time if you missed something... When the script prompt for an input Choose 'Kick Ass' from the list...


3) Now the script will ask you, Whether you want to Enable I/O scheduler... Give 'Yes' to enable it...


4) Thats it... Reboot your Device manually and see the Performance... I Bet you will feel the Increased Performance...

Is this tweak works for you?? Or If you have any Doubts or any help... Just drop a comment here... I will help you Instantly... 


Thanks to Zeppelinrox @ XDA... He is the man behind this Awesome RAM Tweak...

Enjoy and Peace!!!!
Read More